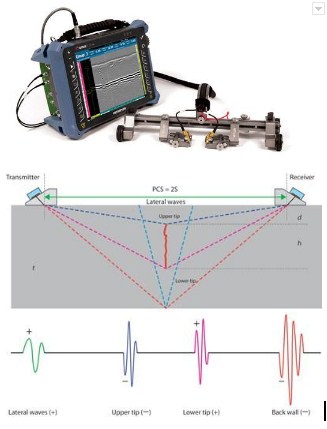
ToFD systems, a pair of ultrasonic probes are used, sitting on opposite sides of a weld-joint or area of interest. A transmitter probe emits an ultrasonic pulse which is picked up by the receiver probe on the opposite side. In an undamaged part, the signals picked up by the receiver probe are from two waves: one that travels along the surface (lateral wave) and one that reflects off the far wall (back-wall reflection). When a discontinuity such as a crack is present, there is a diffraction of the ultrasonic sound wave from the top and bottom tips of the crack. Using the measured time of flight of the pulse, the depth of the crack tips can be calculated automatically by trigonometry application. This method is even more reliable than traditional radiographic, pulse echo manual UT and automated UT weld testing methods.
ToFD offers great accuracy for measuring the critical through-wall size of crack-like-defects. The accuracy of greater than ±1mm can be obtained in a wide range of material thickness from which pressurised components are constructed.
ToFD was initially developed as a method of accurate monitoring and sizing of through-wall height of in-service discontinuities in the Nuclear industry. It has now been independently validated as one of the most effective techniques for locating and sizing discontinuities in ferritic welds.


